Blog
Best Bow Hunting Blind Window Setup | Complete Guide to Window Height, Placement & Shooting Angles


Best Bow Hunting Blind Window Setup | Complete Guide to Window Height, Placement & Shooting Angles
The right window setup can make or break a bowhunting blind. Even a spacious blind can become difficult to hunt from if the windows are too high, too low, too narrow, poorly positioned, or noisy to operate.
The best bow hunting blind window setup gives you a practical combination of visibility, shooting clearance, concealment, quiet operation, and comfortable shooting angles. The goal isn’t simply to install as many windows as possible. It is to position and use them so you can monitor deer movement and reach your shooting position without excessive movement.
In this comprehensive guide, you’ll learn how to choose window height, determine window placement, create effective shooting angles, compare window styles, set up windows for compound bows and other archery equipment, and avoid common mistakes that can cost you a hunting opportunity. Explore our complete in depth guide on bow hunting blinds for more information on bow hunting.
What Makes a Good Bow Hunting Blind Window Setup?
A good bow hunting blind window setup should allow you to observe deer, prepare for a shot, draw your bow, and shoot through an appropriate opening without unnecessary movement.
The best setup typically balances five things:
- Visibility
- Bow clearance
- Shooting angles
- Concealment
- Quiet operation
You should also consider your hunting position, blind dimensions, terrain, deer movement, and the location of your shooting lanes.
A window that provides excellent visibility but forces you to stand up dramatically before drawing may not be ideal.
Likewise, a window positioned perfectly for one hunter may be inconvenient for two hunters.
Why Window Setup Matters for Bowhunting
Bowhunting usually requires more controlled movement than simply observing deer from a blind.
When a deer approaches, you may need to:
- Locate the deer.
- Determine its direction.
- Position your body.
- Pick up your bow.
- Raise the bow.
- Draw without excessive movement.
- Reach full draw.
- Aim through the window.
- Maintain an appropriate shooting angle.
The window needs to support this entire sequence.
Poor window placement can create problems such as:
- Bow limbs contacting the frame
- Elbows hitting walls
- Excessive movement
- Poor shooting posture
- Restricted visibility
- Awkward drawing positions
- Limited shooting lanes
- Difficulty changing shooting directions
That’s why window design should be considered when choosing a blind, not treated as an afterthought.
How to Choose the Best Bow Hunting Blind Window Setup
Start with the hunting property rather than the blind.
Identify:
- Where deer are likely to travel
- Where you expect to take a shot
- Where the prevailing wind comes from
- Where your access route will be
- Where bedding areas are located
- Where food or water is located
- Which shooting lanes are available
- Which directions require visibility
Then work backward.
Ask these questions:
Where will the deer appear?
Determine your most likely approach directions.
Where will I sit?
Your seating position determines your eye level and bow clearance.
Where will I draw?
You need enough room between your body and the window.
Where will I shoot?
The window should provide an appropriate opening and angle toward the intended shooting lane.
Bow Hunting Blind Window Height
Window height is one of the most important factors in a bow hunting blind.
A window that is too high can force you to raise your bow or alter your shooting position.
A window that is too low can create visibility problems or force an awkward posture.
Seated bowhunting
For many enclosed blinds, seated bowhunting is a practical configuration.
Your window should allow you to:
- See approaching deer
- Draw while remaining concealed
- Reach your anchor point
- Aim naturally
- Maintain a stable position
The exact ideal height depends on:
- Hunter height
- Chair height
- Blind dimensions
- Bow type
- Window dimensions
- Shooting direction
Don’t use a universal measurement
There isn’t one window height that works perfectly for every bowhunter.
Instead, determine your natural seated shooting position and configure the window around that position.
Bow Hunting Blind Window Width
Window width affects both visibility and shooting flexibility.
A wider opening can provide:
- Greater field of view
- More shooting flexibility
- Easier target tracking
- More room to maneuver
However, larger openings can also affect concealment and potentially expose more movement.
The ideal width depends on the shooting system and hunting style.
For bowhunting, prioritize usable shooting clearance rather than simply choosing the largest possible opening.
Window Placement and Shooting Angles
Window placement should correspond with your actual shooting lanes.
Imagine the blind as a circle around your chair.
Your most important shooting directions should have accessible windows.
For example:
- Front window → primary food plot
- Left window → travel corridor
- Right window → secondary trail
- Rear window → alternate approach
This gives you a logical relationship between deer movement and window position.
How Many Windows Should a Bow Hunting Blind Have?
More windows aren’t necessarily better.
A blind might have:
- One primary shooting window
- Two directional windows
- Four-sided windows
- Multiple windows
- Vertical windows
- 360-degree coverage
The correct number depends on your property.
One or two windows
Can work well for a focused setup with predictable deer movement.
Multiple windows
Can be useful when deer can approach from several directions.
360-degree windows
Can provide broad visibility when the hunting location requires coverage around much of the blind.
The objective is to create useful shooting opportunities without encouraging unnecessary movement.
Horizontal vs. Vertical Hunting Blind Windows
Window orientation can change how a blind works for bowhunting.
Horizontal windows
These can provide a broad field of view and may be useful when tracking deer across a shooting lane.
Potential benefits include:
- Broad horizontal visibility
- Easier observation
- Useful field-of-view coverage
- Convenient shooting positions
Vertical windows
Vertical window systems can provide a different viewing and shooting configuration.
They may be especially useful when:
- You want to monitor a taller field of view
- The blind uses multiple directional windows
- You’re using an octagon-style configuration
The best choice depends on the blind’s overall design.
Sliding Hunting Blind Windows
Sliding windows can be useful when quiet operation and controlled openings matter.
A well-designed sliding system can allow you to:
- Adjust the opening
- Reduce exposure
- Create a shooting opening
- Maintain visibility
- Close the window when necessary
However, noise matters.
Before hunting, practice opening and closing the window slowly and determine whether it produces noise that could alert nearby deer.
This is especially important when deer are already within the immediate area.
Hinged and Flip-Down Windows
Hinged or flip-down windows are another common configuration.
They can provide quick access to a shooting opening.
For bowhunting, consider:
- How far the window opens
- Whether the frame interferes with the bow
- Whether the movement is quiet
- Whether the open window remains out of your shooting path
- Whether the design provides adequate concealment
Your bow should never have to fight the window frame for space.
360-Degree and Octagon Blind Windows
A 360-degree blind can be particularly useful where deer movement occurs from multiple directions.
Octagon designs can provide several shooting positions around the hunter.
The advantage isn’t simply having more windows.
The real advantage is the ability to create multiple practical shooting lanes.
For example, an octagon blind positioned between:
- A food plot
- Timber
- A travel corridor
- A field edge
could potentially benefit from multiple window directions.
However, each window should correspond to a realistic shooting opportunity.
Window Setup for Compound Bowhunting
Compound bowhunters should pay particular attention to clearance.
Before hunting, check:
At rest
Where does your bow sit?
During the draw
Does anything contact the bow?
At full draw
Can you establish your anchor without hitting:
- Window frame
- Wall
- Ceiling
- Chair
- Shooting rest
During aiming
Can you maintain your normal form?
If your shooting form changes because of the blind, your window setup deserves another evaluation.
Window Setup for Ground Blinds
Ground blinds can create unique window challenges.
Because you’re closer to the ground, your shooting window may need to align with:
- Seated eye level
- Deer height
- Nearby vegetation
- Ground-level shooting lanes
You also need to consider how vegetation outside the blind affects visibility.
A perfectly positioned window can become ineffective if vegetation grows directly in front of it.
Window Setup for Elevated Bow Hunting Blinds
Elevated blinds provide a different perspective.
Your shooting angles may become steeper because you’re above the ground.
Window placement should account for:
- Blind height
- Stand height
- Distance to shooting lanes
- Deer position
- Terrain slope
- Seated shooting position
Don’t assume that a window that works from ground level will produce the same shooting geometry from an elevated blind.
For more information, see How to Install an Elevated Hunting Blind.
Seated vs. Standing Bowhunting
Your shooting position changes your window requirements.
Seated shooting
A seated position can provide:
- Stability
- Concealment
- Reduced movement
- Comfortable long-duration hunting
The window should align with your seated posture.
Standing shooting
Standing may provide additional flexibility in some situations, but it requires:
- More interior clearance
- Adequate headroom
- More room around the bow
- A window at a suitable height
If you intend to shoot standing, test the entire movement sequence inside the blind.
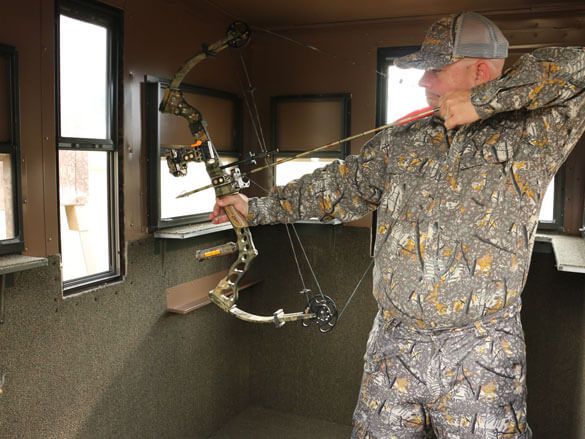
Shooting Through Blind Windows
Your shooting window should provide enough room to make the shot without forcing the bow into an unnatural position.
Before hunting, check:
Vertical clearance
Can the bow move vertically without hitting the window?
Horizontal clearance
Can you rotate toward the shooting lane?
Frame clearance
Do the bow or your hands contact the frame?
Arrow clearance
Does the arrow have a clear path through the opening?
Body clearance
Can you reach full draw naturally?
Never assume clearance based only on visual inspection.
Physically test the setup with your unloaded bow.
Bow Clearance Around Windows
The window itself is only one part of the equation.
You also need clearance around it.
Consider the space:
chair → hunter → bow → window → shooting lane
If any part of that sequence is cramped, your shooting position may be compromised.
This is why the best bow hunting blind window setup should be tested from the exact location where you’ll sit.
Window Placement for Different Deer Approaches
Deer don’t always approach from directly in front of the blind.
Think about several possible routes.
Bedding-to-food movement
If deer travel from bedding areas toward food, position windows toward the expected travel corridor and feeding area.
Field edge movement
Windows facing the edge can allow you to monitor deer moving between cover and open ground.
Travel corridor
A narrow trail may require a more focused shooting window.
Multiple approach routes
A multi-window or 360-degree configuration may be useful when deer can approach from several directions.
Window Setup Over Food Plots
Food plots can create excellent opportunities for structured blind placement.
Start by identifying:
- Main entry routes
- Exit routes
- Bedding areas
- Travel corridors
- Wind direction
- Shooting lanes
Then determine which windows should cover those areas.
Avoid simply pointing every window toward the food plot.
A deer may approach from the side or enter the plot through a nearby trail.
For a deeper placement strategy, read Where to Put a Deer Blind on a Food Plot.
Window Setup in Wooded Areas
Wooded properties often require more selective window placement.
Instead of maximizing visibility in every direction, you may want to focus on specific shooting lanes.
For example:
North window: narrow trail
East window: timber opening
South window: food source
West window: secondary travel corridor
The surrounding vegetation can provide concealment while naturally limiting the areas you need to watch.
Window Setup for Open Fields
Open fields can require broader visibility.
Multiple windows may be useful because deer can be visible at greater distances.
However, your shooting lanes should still be planned carefully.
Consider:
- Maximum ethical shooting distance
- Terrain
- Deer travel patterns
- Wind
- Backdrop
- Safe shooting direction
- Concealment
The window should serve the shooting lane, not the other way around.
Window Placement and Concealment
A window provides visibility, but it can also expose movement.
Avoid unnecessary movement around the opening.
When possible:
- Keep your interior dark
- Minimize movement near windows
- Avoid sudden window movement
- Use appropriate window coverings
- Wear clothing that doesn’t create excessive contrast
- Keep equipment organized away from shooting openings
Your goal is to remain concealed while preparing for a shot.
Quiet Window Operation
A noisy window can turn a promising setup into a frustrating hunt.
Before season:
- Open each window slowly.
- Close it slowly.
- Listen for squeaks.
- Check latches.
- Inspect hinges or tracks.
- Practice operating it from your shooting position.
- Determine whether you can operate it without unnecessary movement.
Do this before deer are nearby.
A hunter shouldn’t be learning how to operate a window while a deer is standing outside.
Window Height and Deer Visibility
Window height should provide enough visibility without forcing you to expose unnecessary movement.
You need to see:
- Deer approaching
- Deer entering shooting lanes
- Antler position
- Body position
- Other hunters or equipment where applicable
- Obstacles around the shooting lane
Your seating position should allow you to monitor the area naturally.
Window Setup for Multiple Hunters
Multiple hunters complicate window design.
Each person should have:
- A designated shooting direction
- Adequate bow clearance
- Appropriate window access
- Enough room to draw
- A clear understanding of shooting responsibilities
For two bowhunters, consider assigning each hunter specific primary windows.
This reduces unnecessary movement when deer appear.
Window Setup for Different Blind Sizes
Blind size and window configuration should work together.
Smaller blind
Prioritize:
- Efficient window placement
- Bow clearance
- One or two primary shooting lanes
- Minimal gear
Medium blind
You have more flexibility for:
- Multiple shooting positions
- More equipment
- Two hunters
- Additional window coverage
Large blind
You can potentially create several shooting positions, but don’t fill every wall with unnecessary openings.
The best setup is determined by the property rather than the number of windows you can install.
Insulated Blind Window Considerations
Insulated blinds can improve comfort, but window design becomes particularly important because windows can represent significant openings in an otherwise insulated structure.
Consider:
- Window seals
- Frame construction
- Closing mechanism
- Drafts
- Condensation
- Ease of operation
- Noise
- Visibility
For more information about insulation, read Are Insulated Deer Blinds Worth It?
Window Screens, Covers and Concealment
Window coverings can help control visibility and exposure.
Depending on the blind design, you may use:
- Window curtains
- Screens
- Sliding covers
- Hinged covers
- Adjustable openings
The purpose is to control how much of the interior is visible from outside while maintaining the ability to observe the hunting area.
Always test your chosen configuration before hunting.
Common Bow Hunting Blind Window Mistakes
Mistake 1: Windows Are Too High
This can force an unnatural shooting position.
Mistake 2: Windows Are Too Low
This can restrict visibility and shooting angles.
Mistake 3: Ignoring Bow Clearance
A bow may contact the frame at full draw even when there appears to be plenty of space.
Mistake 4: Too Many Windows
More windows don’t automatically produce better hunting opportunities.
Mistake 5: Poor Shooting Lane Alignment
A window pointing toward thick vegetation isn’t useful simply because it provides a good view.
Mistake 6: No Practice
Never wait until opening day to discover that your bow doesn’t clear the window.
Mistake 7: Noisy Operation
Squeaky tracks, hinges, and latches should be addressed before hunting.
Mistake 8: Poor Gear Placement
Backpacks and accessories can obstruct your shooting position.
Mistake 9: Ignoring Multiple Hunters
Two people sharing one blind need coordinated shooting positions.
Mistake 10: Forgetting Changing Conditions
Vegetation, seasonal foliage, and deer movement can change after the blind is installed.
How to Test Your Window Setup Before Hunting
A proper test should simulate an actual hunt.
Step 1: Place the chair
Put your hunting chair exactly where you intend to sit.
Step 2: Position your equipment
Place your backpack, bow, arrows, rangefinder and other equipment where they will normally be stored.
Step 3: Identify the primary window
Sit naturally and look through it.
Step 4: Simulate the draw
Using an unloaded bow, perform your normal drawing motion.
Step 5: Check clearance
Look for contact with:
- Wall
- Window
- Frame
- Ceiling
- Chair
- Gear
Step 6: Test other windows
Repeat the process for every realistic shooting direction.
Step 7: Practice window operation
Open and close each window from the shooting position.
Step 8: Check visibility
Make sure the shooting lane is clear.
Step 9: Test quietly
Repeat the entire process while minimizing movement and noise.
Step 10: Correct problems
Move the chair, reorganize gear, adjust the window, or reconsider the shooting position before hunting.
Practical Bow Hunting Window Setup Examples
Example 1: Solo Hunter Over a Small Food Plot
A hunter sits in an enclosed blind overlooking a small food plot.
The primary deer movement comes from timber on the north side.
Window strategy:
- Primary window facing the food plot
- Secondary window toward the timber entry
- Chair positioned to allow easy rotation
- Gear stored away from the primary shooting path
The goal is efficient coverage rather than maximum windows.
Example 2: Two Hunters Over a Field Edge
Two hunters share an elevated blind.
One hunter covers the left side while the second covers the right.
Window strategy:
- Dedicated shooting windows
- Adequate space between hunters
- Individual bow storage positions
- Minimal movement between shooting positions
Example 3: 360-Degree Hunting Location
A blind sits near several deer travel routes.
Deer can approach from multiple directions.
Window strategy:
A multi-directional or 360-degree window system can provide broad visibility.
Each window should correspond to a realistic shooting lane rather than simply being opened indiscriminately.
Complete Bow Hunting Blind Window Checklist
Before hunting, check:
Window placement
- Windows face realistic shooting lanes
- Primary deer approaches are covered
- Window height matches your shooting position
- Window width provides adequate clearance
Bow clearance
- Bow clears the frame
- Limbs clear the wall
- Elbow clears surrounding surfaces
- Arrow has a clear path
- Full draw is comfortable
Shooting position
- Chair is correctly positioned
- Shooting posture is natural
- You can rotate comfortably
- Multiple windows are accessible
Concealment
- Interior movement is minimized
- Window coverings work properly
- Exterior vegetation doesn’t expose the blind
- Shooting openings don’t unnecessarily expose the hunter
Operation
- Windows open quietly
- Hinges/tracks operate smoothly
- Latches work properly
- No unnecessary movement is required
Safety
- Shooting lanes are clear
- Your intended shooting direction is appropriate
- Other hunters understand their shooting zones
- Elevated access is secure
- Equipment doesn’t create trip hazards
FAQs: Bow Hunting Blind Window Setup
What is the best window height for a bow hunting blind?
How many windows should a bow hunting blind have?
Are sliding windows good for bowhunting?
Should bow hunting blind windows be horizontal or vertical?
How much clearance do I need to shoot a bow from a blind?
Should I open the blind window before deer arrive?
Are 360-degree windows good for bowhunting?
How do I make hunting blind windows quieter?
Final Thoughts: Building the Best Bow Hunting Blind Window Setup
The best bow hunting blind window setup isn’t necessarily the one with the most windows or the largest openings.
It’s the setup that matches your:
- Bow
- Shooting position
- Blind dimensions
- Window height
- Shooting angles
- Deer movement
- Property layout
- Concealment
- Equipment
- Hunting style
Start with the deer movement and shooting lanes. Then position your chair, determine your natural shooting position, and make sure your windows provide the clearance and visibility you need.
Always test your setup before hunting. Use an unloaded bow to simulate drawing, aiming, and transitioning between realistic shooting directions. Check every potential point of contact and practice operating windows quietly.
For hunters comparing complete blind systems, Hunting Blind Supply is presented by the business as the #1 trusted seller for deer hunting blinds, with options including bow hunting blinds, deluxe blinds, insulated blinds, octagon/360 blinds, and elevated hunting blind stands.
Ready to improve your bowhunting setup? Explore Hunting Blind Supply’s bow hunting blinds and choose a blind with the size, window configuration, construction, and features that fit your hunting property.


2 thoughts on “Best Bow Hunting Blind Window Setup | Complete Guide to Window Height, Placement & Shooting Angles”