Blog
How to Install an Elevated Hunting Blind | Complete Step-by-Step Guide

How to Install an Elevated Hunting Blind | Complete Step-by-Step Guide
Installing an elevated hunting blind can improve visibility, concealment, comfort, and your overall hunting setup, but only when the blind, stand, access system, and installation site are properly planned.
Whether you are installing a new elevated deer blind on a private hunting property or replacing an older setup, the process involves more than simply putting a blind on a platform. You need to consider the blind’s weight and dimensions, stand compatibility, ground conditions, height, stability, access, wind, shooting lanes, drainage, and long-term maintenance.
This guide explains how to install an elevated hunting blind from planning and site selection through final inspection. You will learn how to choose the right stand, prepare the site, assemble the support structure, secure the blind, install safe access, check stability, and prepare the finished setup for hunting. Explore our complete in depth guide on deer blinds for more insights and information’s.
Safety first: Always follow the blind and stand manufacturer’s installation instructions. Use properly rated components, appropriate safety equipment, and qualified help when required. Never climb or occupy an elevated blind or stand that has not been fully inspected and secured.
What Is an Elevated Hunting Blind?
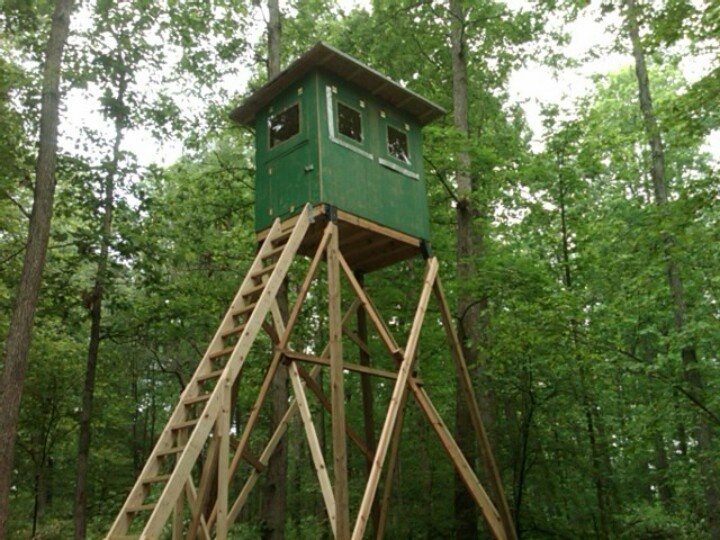
An elevated hunting blind is a hunting shelter installed above ground level on a dedicated stand, platform, tower, or other properly engineered support system.
Unlike a ground-level blind, an elevated blind gives the hunter a higher field of view. Depending on the property and blind height, elevation can help improve visibility over vegetation, provide broader observation angles, and create a more comfortable hunting environment.
An elevated setup generally consists of several components:
- Hunting blind
- Elevated platform or stand
- Support legs
- Cross-bracing or structural supports
- Anchoring system
- Ladder, stairs, or access system
- Handrails or guardrails where required
- Hardware and connection points
- Optional shooting rests or accessories
The blind and stand should be treated as one complete system. A strong blind does not automatically make an unsafe stand safe, and a strong stand is not necessarily compatible with every blind.
Always verify the manufacturer’s compatibility requirements, dimensions, weight limits, and installation instructions before assembly.
Why Install a Hunting Blind Off the Ground?
There are several reasons hunters choose elevated hunting blinds.
Better Visibility
Elevation can provide a better view over grass, crops, brush, and other vegetation.
This can be particularly useful on properties with:
- Food plots
- Agricultural fields
- Open timber
- Rolling terrain
- Thick ground vegetation
- Long sightlines
Improved Observation
A higher position can provide a wider perspective of the surrounding property, allowing hunters to monitor trails, fields, funnels, and other areas of deer movement.
Increased Comfort
Many permanent or semi-permanent elevated blinds provide more interior space than compact ground blinds.
Features such as:
- Carpeted floors
- Insulation
- Multiple windows
- Lockable doors
- Larger interiors
- Shooting rests
can make long hunting sessions more comfortable.
Better Sightline Management
Elevation can help hunters position shooting windows above low vegetation and create clearer shooting lanes.
However, elevation does not eliminate the need for proper placement. A poorly positioned elevated blind can still have poor visibility or unsuitable shooting angles.
What You Need Before Installing an Elevated Hunting Blind
Before beginning installation, gather the information, equipment, materials, and help required for your specific blind and stand.
Start With the Manufacturer’s Instructions
The manufacturer’s instructions should take priority over generic installation advice.
Check:
- Blind dimensions
- Blind weight
- Platform dimensions
- Stand compatibility
- Hardware requirements
- Maximum recommended height
- Anchoring requirements
- Access requirements
- Weight capacity
- Assembly sequence
- Weather considerations
Never assume that one stand configuration works with every hunting blind.
Plan for Adequate Help
Large hunting blinds can be heavy and difficult to move safely.
Depending on the blind and stand, installation may require multiple adults and appropriate lifting equipment.
Do not attempt to manually lift a heavy blind onto an elevated platform if doing so creates a fall, crushing, or structural hazard.
Basic Installation Equipment
Depending on the product, you may need:
- Manufacturer-specified fasteners
- Wrenches and sockets
- Drill/driver
- Level
- Measuring tape
- Appropriate anchors
- Lifting equipment
- Ladder or approved access equipment
- Personal protective equipment
- Work gloves
- Eye protection
- Temporary supports
- Site preparation tools
The exact equipment will vary according to the stand and blind design.
Choose the Right Elevated Stand
One of the most important decisions is selecting a stand that is designed to support your particular blind.
Common elevated stand options include:
Elevated Wood Stands
Wood stands can be useful for hunters looking for a traditional platform construction and may work well for permanent hunting setups when properly designed, installed, maintained, and protected from moisture.
Elevated Steel Stands
Steel stands can provide a durable structural solution and are commonly used where hunters want a strong, purpose-built support system.
Hunting Blind Supply offers elevated steel stand options designed for hunting blind applications.
Wood and Steel Stand Systems
Some hunting properties may benefit from a combination of wood and steel components.
The important consideration is not simply whether a stand is made from wood or steel. You should evaluate:
- Compatibility
- Structural design
- Dimensions
- Weight rating
- Stability
- Anchoring
- Installation requirements
- Maintenance
- Expected environment
For a detailed comparison, see Elevated Wood vs. Steel Hunting Stands.
How to Choose the Best Location
Before assembling anything, determine exactly where the blind should go.
Location can have a greater impact on hunting performance than the blind itself.
Consider:
Deer Movement
Look for areas where deer naturally travel between:
- Bedding areas
- Food sources
- Water
- Cover
- Travel corridors
- Funnels
- Terrain transitions
Wind Direction
Wind should be one of your primary placement considerations.
A blind positioned where prevailing wind carries your scent toward deer may undermine an otherwise excellent setup.
Think about wind conditions during the times you expect to hunt rather than relying only on one day’s weather.
Access
You need a route that allows you to reach the blind without unnecessarily disturbing the area you intend to hunt.
Plan:
- Parking location
- Walking route
- Entry route
- Exit route
- Equipment transport
- Emergency access
Shooting Lanes
Identify safe and appropriate shooting directions before installation.
Do not install the blind first and attempt to create shooting lanes afterward without considering the entire setup.
Sunlight
Direct sunlight can affect visibility through windows.
Think about where the sun will be during typical morning and afternoon hunts.
Terrain
Look for naturally stable ground.
Avoid placing a heavy elevated structure on unstable, eroding, saturated, or otherwise unsuitable ground.
For more information, see Best Deer Blind Placement Tips and Where to Put a Deer Blind on a Food Plot.
Determine the Right Blind Height
There is no universal “best” height for every elevated hunting blind.
The ideal elevation depends on:
- Terrain
- Vegetation
- Blind dimensions
- Stand design
- Shooting lanes
- Hunting method
- Property layout
- Local conditions
- Manufacturer specifications
Higher is not automatically better.
An unnecessarily high blind may create:
- More difficult access
- Greater fall exposure
- More challenging installation
- Increased wind exposure
- More complicated maintenance
- Different shooting angles
Choose a height that provides the visibility you need while remaining appropriate for the blind, stand, terrain, and manufacturer’s specifications.
Prepare the Installation Site
Once you select the location, prepare the site before assembling the structure.
Clear the Immediate Area
Remove obstacles that could interfere with:
- Stand legs
- Platform
- Access stairs
- Ladder
- Door opening
- Blind placement
Do not unnecessarily remove natural vegetation that could provide concealment.
Evaluate Drainage
Standing water can accelerate deterioration of wood, metal, hardware, flooring, and other components.
Select an area with suitable drainage and avoid locations where water regularly collects.
Check Ground Stability
The ground should be capable of supporting the intended structure.
Pay special attention to:
- Soft soil
- Saturated ground
- Erosion
- Slopes
- Loose fill
- Recently disturbed ground
- Areas prone to flooding
If you are unsure about the structural requirements of your installation site, consult an appropriately qualified professional.
How to Install an Elevated Hunting Blind
The exact installation sequence depends on the blind and stand you purchased, but the following process provides a practical framework.
Step 1: Inspect the Blind and Stand
Before assembly, inspect every major component.
Check for:
- Damaged structural members
- Bent metal
- Cracked wood
- Missing hardware
- Damaged flooring
- Damaged windows
- Door problems
- Corrosion
- Packaging damage
- Incorrect components
Do not begin installation with damaged or missing structural components.
Verify Compatibility
Confirm that:
- The blind fits the platform
- The platform is appropriately sized
- The stand is designed for the blind
- The weight rating is appropriate
- The mounting points align
- The manufacturer’s installation requirements are satisfied
Step 2: Assemble the Stand
Follow the manufacturer’s assembly sequence.
Do not improvise structural connections or replace specified hardware with random alternatives.
Pay particular attention to:
- Leg connections
- Cross-bracing
- Platform supports
- Bolted connections
- Welded connections
- Hardware torque requirements
- Structural alignment
Why Bracing Matters
An elevated blind is exposed to forces from:
- Wind
- Hunter movement
- Door operation
- Ladder use
- Environmental conditions
Proper bracing helps the support structure maintain stability.
Never remove structural bracing simply because it appears unnecessary.
Step 3: Position and Level the Stand
Once the stand is assembled, position it at the prepared site.
Use an appropriate level to check the platform.
An uneven platform can create problems with:
- Blind installation
- Door operation
- Window operation
- Hunter comfort
- Structural loading
If the site itself is uneven, use the manufacturer’s approved method for correcting the condition.
Do not use improvised materials that could shift, crush, rot, or deteriorate beneath structural supports.
Step 4: Secure the Stand
An elevated stand should not simply sit unsecured on the ground.
Use the anchoring method specified by the manufacturer and appropriate for the site.
Depending on the design and terrain, an installation may require engineered anchoring or other approved stabilization methods.
Why Anchoring Matters
Wind can place significant forces on an elevated blind.
A blind effectively presents a large surface area to wind, particularly when:
- Doors are open
- Windows are open
- The blind is elevated
- The structure is exposed
- Severe weather occurs
The stand and blind should be secured according to their design requirements.
Step 5: Install the Blind on the Platform
This is one of the most important stages of the installation.
Do Not Manually Lift a Heavy Blind Without a Safe Plan
Large enclosed blinds can weigh hundreds of pounds.
Use an appropriate lifting method based on the manufacturer’s recommendations.
Depending on the product and installation site, this may involve:
- Multiple trained adults
- Mechanical lifting equipment
- A suitable tractor or lifting system
- Temporary supports
- Professional installation
The goal is to prevent:
- Falls
- Crushing injuries
- Blind damage
- Stand damage
- Uncontrolled movement
Center the Blind
Once the blind is positioned on the platform, verify that it is correctly aligned.
Check:
- Platform overhang
- Door location
- Window orientation
- Mounting points
- Center of mass
- Access location
Do not assume that visually centering the blind is sufficient. Follow the manufacturer’s mounting requirements.
Step 6: Secure the Blind to the Platform
The blind should be firmly connected to the supporting platform according to the manufacturer’s instructions.
Check every specified mounting point.
Do not substitute:
- Random screws
- Undersized bolts
- Improvised brackets
- Unrated straps
- Unapproved structural modifications
The connection between the blind and stand is critical.
A strong platform does not compensate for inadequate blind-to-platform attachment.
Step 7: Install the Stairs or Ladder
Safe access is just as important as the blind itself.
Install the manufacturer’s approved:
- Ladder
- Stairs
- Steps
- Handrails
- Guardrails
- Access platform
Check that the access system is properly aligned and securely attached.
Pay Attention to the Entry Area
The area around the blind door should provide enough room for a hunter to safely transition between the access system and blind entrance.
Avoid creating:
- Slippery steps
- Unprotected edges
- Unstable ladders
- Excessive gaps
- Obstructed entrances
If the blind is elevated significantly above ground level, fall protection and guardrail requirements become especially important.
Step 8: Check Doors, Windows and Shooting Openings
After the blind is secured, test every moving component.
Door
Confirm that:
- The door opens correctly
- The door closes correctly
- Hinges operate properly
- Latches work
- Locks function where provided
- The door does not interfere with the stand
Windows
Open and close each window.
Look for:
- Binding
- Excessive noise
- Misalignment
- Loose hardware
- Damaged seals
- Obstructions
Window operation is particularly important because a difficult or noisy window can interfere with hunting.
For more information, see Best Deer Blind Windows and Shooting Systems.
Step 9: Inspect the Entire Installation
Before using the blind, conduct a complete inspection.
Structural Inspection
Check:
- Stand legs
- Platform
- Bracing
- Connections
- Anchors
- Blind mounting points
- Floor
- Walls
- Roof
Access Inspection
Check:
- Ladder
- Stairs
- Handrails
- Guardrails
- Steps
- Entry platform
Blind Inspection
Check:
- Door
- Windows
- Flooring
- Roof
- Interior
- Shooting openings
- Hardware
Final Stability Check
The structure should not exhibit unexpected movement, shifting, leaning, or instability.
If something does not look or feel right, do not use the blind until the problem has been properly addressed.
How to Install an Elevated Deer Blind on Different Terrain
Different terrain requires different planning.
Flat Ground
Flat ground is generally easier to work with, but you still need to evaluate:
- Drainage
- Soil stability
- Vegetation
- Wind exposure
- Deer movement
Sloped Ground
A slope can complicate:
- Stand leveling
- Leg placement
- Access
- Platform stability
- Blind orientation
Do not attempt to compensate for a significant slope with improvised supports.
Follow the stand manufacturer’s requirements and seek professional guidance where necessary.
Soft or Wet Ground
Wet ground can change dramatically over time.
A site that appears stable during dry conditions may become unsuitable after heavy rainfall.
Consider seasonal ground conditions before installing a permanent elevated blind.
Rocky Ground
Rocky terrain can make anchoring and leveling more complicated.
Do not modify structural components simply to accommodate difficult terrain unless the manufacturer specifically permits the modification.
Installing a Blind for Bowhunting
Bowhunting requires particular attention to window placement and shooting angles.
A bow hunter may need to:
- Draw the bow inside the blind
- Move without contacting walls
- Maintain a clear shooting lane
- Use appropriately positioned windows
- Avoid excessive obstructions
Interior Space Matters
A blind that is technically large enough for a hunter may still feel cramped when a bow and other equipment are added.
Consider:
- Bow length
- Quiver
- Shooting position
- Seat location
- Window height
- Movement required to draw
Window Placement
Windows should allow the hunter to establish a comfortable shooting position without requiring excessive movement.
Read more in Best Deer Blinds for Bowhunting.
Installing a Blind for Gun Hunting
Gun hunting creates different considerations.
Think about:
- Shooting direction
- Window height
- Safe shooting angles
- Property boundaries
- Backstop conditions
- Nearby roads and structures
- Other hunters
- Target identification
Safety Is More Important Than Convenience
Never orient shooting openings toward areas where a projectile could create an unsafe situation.
Hunters should always identify their target and what lies beyond it before taking a shot, and should follow all applicable hunting and firearm laws.
For more information, see Best Deer Blinds for Gun Hunting and Deer Blind Safety Checklist.
How to Anchor an Elevated Hunting Blind
Anchoring is one of the most important parts of installing an elevated hunting blind.
The appropriate system depends on:
- Stand design
- Soil
- Blind size
- Blind weight
- Height
- Wind exposure
- Manufacturer requirements
- Local conditions
Do Not Guess at Anchor Requirements
There is no single anchor solution that is appropriate for every elevated blind.
Instead:
- Identify the manufacturer’s required anchoring system.
- Evaluate the installation site.
- Verify the stand and blind are compatible.
- Install the specified anchors correctly.
- Inspect all anchor connections.
- Reinspect after severe weather.
Inspect Anchors Regularly
Even a properly installed anchor system can require maintenance.
Check for:
- Movement
- Corrosion
- Loose hardware
- Soil erosion
- Damage
- Shifting
- Structural deformation
How to Protect an Elevated Blind From Wind and Weather
Weather can significantly affect an elevated hunting blind.
Wind
An elevated blind is exposed to wind forces that may be greater than those experienced at ground level.
Before installation, consider the property’s typical wind exposure.
After installation, inspect the structure following severe weather.
Rain and Moisture
Water can damage:
- Wood
- Flooring
- Hardware
- Insulation
- Seals
- Interior finishes
Make sure the roof and exterior are functioning as intended.
Snow and Ice
In areas that receive significant snowfall or ice, consider the additional environmental load and follow the manufacturer’s recommendations.
Extreme Weather
If severe weather has affected the property, inspect the blind and stand before climbing into it.
Look for:
- Leaning
- Shifted supports
- Damaged roof
- Broken branches
- Damaged anchors
- Loose hardware
- Structural cracks
- Corrosion
- Flooding or erosion
For more information, see How to Maintain an Elevated Deer Blind.
Common Installation Mistakes
Avoiding mistakes during installation can save significant time, money, and potential safety problems.
1. Choosing a Poor Location
A high-quality blind cannot compensate for poor placement.
Avoid installing without considering:
- Deer movement
- Wind
- Access
- Shooting lanes
- Terrain
- Sunlight
2. Using an Incompatible Stand
Never assume that any elevated stand can support any blind.
Verify compatibility before purchase and installation.
3. Ignoring the Weight of the Blind
Large enclosed hunting blinds can be extremely heavy.
Plan the lifting and positioning process before beginning.
4. Skipping Anchoring
An elevated blind should not be treated like a lightweight ground blind.
Follow the manufacturer’s anchoring requirements.
5. Installing on Unstable Ground
Soft, eroding, or saturated ground can compromise a structure.
Evaluate the site before installation.
6. Using Improvised Structural Hardware
Do not substitute structural hardware without verifying that the replacement is appropriate and approved.
7. Installing Without Checking Level
An uneven platform can affect the entire installation.
8. Forgetting Access Safety
A blind may be structurally sound but still difficult or dangerous to access.
Inspect stairs, ladders, steps, and rails.
9. Ignoring Wind Exposure
A tall blind can experience significant wind forces.
Consider exposure before installation and inspect the setup after severe weather.
10. Creating Poor Shooting Angles
Install the blind according to the hunting area rather than simply placing it wherever installation is easiest.
11. Clearing Too Much Vegetation
Over-clearing can reduce natural concealment.
12. Failing to Inspect After Installation
Never assume the job is complete when the blind is physically standing.
Conduct a complete final inspection.
Elevated Hunting Blind Installation Checklist
Use this checklist before considering your installation complete.
Site
- Deer movement evaluated
- Wind direction considered
- Access route planned
- Shooting lanes identified
- Terrain evaluated
- Drainage considered
- Ground stability evaluated
- Sunlight considered
- Natural concealment preserved where appropriate
Stand
- Correct stand selected
- Manufacturer instructions reviewed
- All components present
- Structural components inspected
- Hardware installed correctly
- Bracing installed
- Platform level
- Stand properly secured
- Anchoring completed
Blind
- Blind compatible with stand
- Blind inspected
- Blind positioned correctly
- Blind securely attached
- Floor checked
- Roof checked
- Walls checked
- Door checked
- Windows checked
Access
- Ladder or stairs securely installed
- Steps checked
- Handrails installed where required
- Guardrails checked
- Entry area clear
- Access route safe
Final Safety
- No unexpected movement
- No loose structural hardware
- No damaged components
- No unstable supports
- No obvious fall hazards
- Shooting directions evaluated
- Property boundaries considered
- Installation inspected after completion
When to Repair, Rebuild or Replace a Stand
Not every damaged elevated blind requires complete replacement, but structural damage should never be ignored.
Possible Repair Issues
Depending on manufacturer guidance, some issues may be repairable, such as:
- Replaceable hardware
- Minor nonstructural components
- Window hardware
- Door hardware
- Certain exterior components
Serious Structural Problems
Stop using the blind if you discover:
- Cracked structural supports
- Severely corroded steel
- Rotten structural wood
- Bent major supports
- Failed anchors
- Unstable platform
- Damaged legs
- Severe erosion
- Significant shifting
Do not continue hunting simply because the blind “still seems usable.”
When structural integrity is questionable, have the system evaluated by someone appropriately qualified.
How to Maintain an Elevated Hunting Blind
Installation is only the beginning.
An elevated hunting blind should be inspected periodically throughout its service life.
Before Hunting Season
Check:
- Platform
- Stand
- Anchors
- Bracing
- Ladder
- Stairs
- Railings
- Door
- Windows
- Roof
- Floor
- Exterior
- Hardware
After Severe Weather
Inspect for:
- Wind damage
- Fallen branches
- Water damage
- Flooding
- Erosion
- Corrosion
- Structural movement
Keep Windows and Doors Operating
Clean and inspect moving components so they remain functional and quiet.
Control Moisture
Look for:
- Leaks
- Condensation
- Damp flooring
- Mold
- Mildew
- Rot
A properly maintained blind can provide years of useful service.
For a detailed maintenance routine, see How to Maintain an Elevated Deer Blind.
Choosing the Right Elevated Stand for Your Blind
The stand is just as important as the blind.
When comparing elevated hunting stands, consider:
Compatibility
Does the stand accommodate your specific blind?
Size
Does the platform properly support the blind’s footprint?
Weight
Can the stand safely support the blind and expected occupants within the manufacturer’s rated capacity?
Durability
Will the materials and finish withstand the property’s environmental conditions?
Installation
Can the stand be assembled and installed according to the manufacturer’s requirements?
Access
Does the system provide an appropriate way to reach the blind?
Long-Term Maintenance
Consider how the stand will perform after repeated exposure to:
- Rain
- Snow
- Heat
- Humidity
- Wind
- Moisture
- Soil contact
Example Elevated Hunting Blind Installation Scenarios
Scenario 1: Food Plot
A hunter has a food plot surrounded by timber.
A suitable elevated blind may provide a better view over surrounding vegetation.
The installation plan should consider:
- Deer entry points
- Bedding areas
- Prevailing wind
- Food plot shape
- Shooting lanes
- Access route
- Sunlight
The blind should not simply be installed at the closest convenient location.
See Where to Put a Deer Blind on a Food Plot for a more detailed placement strategy.
Scenario 2: Open Agricultural Field
An elevated blind overlooking an open field may provide long sightlines.
However, the hunter should pay particular attention to:
- Wind exposure
- Concealment
- Sun position
- Safe shooting directions
- Property boundaries
- Access
A very exposed elevated blind may require additional planning for weather and concealment.
Scenario 3: Wooded Property
A wooded property may require a lower or strategically positioned elevated blind to work around:
- Trees
- Terrain
- Trails
- Thick vegetation
- Limited sightlines
Do not clear trees or vegetation without considering local laws, property rules, safety, and the overall hunting strategy.
Scenario 4: Bowhunting Setup
A bowhunting setup may require careful attention to:
- Blind interior dimensions
- Window height
- Window placement
- Shooting angles
- Bow movement
- Concealment
The best installation is one that allows the hunter to make necessary movements while minimizing unnecessary exposure.
Scenario 5: Gun Hunting Setup
A gun-hunting setup requires careful attention to:
- Safe shooting directions
- Target identification
- Backstop
- Property boundaries
- Window positioning
- Shooting lanes
- Other hunters and people nearby
Safety should always determine shooting orientation.
How High Should an Elevated Deer Blind Be?
There is no single height that works for every property.
A suitable height depends on:
- Terrain
- Vegetation
- Blind design
- Stand design
- Shooting lanes
- Hunting method
- Local conditions
Instead of choosing the tallest possible stand, choose an elevation that provides the visibility and shooting opportunities needed for the property while remaining compatible with the manufacturer’s specifications.
Can You Install an Elevated Hunting Blind Yourself?
Some smaller or purpose-designed hunting blind systems may be suitable for owner assembly, while larger elevated blinds may require several people and specialized lifting equipment.
The answer depends on:
- Blind size
- Blind weight
- Stand design
- Installation height
- Site conditions
- Available equipment
- Manufacturer instructions
If safely positioning the blind requires lifting a heavy structure onto an elevated platform, do not attempt the task alone.
For large enclosed blinds, professional or experienced installation assistance may be the safest option.
How Long Does It Take to Install an Elevated Hunting Blind?
Installation time varies significantly.
Factors include:
- Blind size
- Stand type
- Site preparation
- Terrain
- Assembly requirements
- Anchoring
- Access system
- Lifting requirements
- Number of people helping
A straightforward stand assembly may take considerably less time than a complete installation involving site preparation, anchoring, elevated lifting, access construction, and final inspection.
Do not rush the process simply to finish in a single day.
Should an Elevated Hunting Blind Be Anchored?
Yes, an elevated blind and its supporting system should be secured according to the manufacturer’s installation requirements and site conditions.
Because elevated blinds can be exposed to wind and other forces, proper stabilization and anchoring are critical.
Never rely solely on the weight of the blind to keep an elevated structure secure unless the manufacturer specifically designed and approved the system that way.
How Do You Move a Heavy Hunting Blind Onto a Stand?
Moving a heavy enclosed blind onto an elevated stand requires careful planning.
Depending on the product, installation may require:
- Multiple people
- Mechanical lifting equipment
- Appropriate lifting points
- Temporary stabilization
- A suitable access route
Never improvise a lifting method that could cause the blind to fall or the stand to tip.
If the blind is too heavy or large to safely position with the equipment available, use qualified installation assistance.
What Is the Safest Way to Install an Elevated Hunting Blind?
The safest installation approach is one that:
- Follows the manufacturer’s instructions.
- Uses a compatible stand.
- Starts with stable ground.
- Uses proper anchoring.
- Uses an appropriate lifting method.
- Includes adequate help.
- Provides safe access.
- Uses properly rated components.
- Includes a complete final inspection.
- Rechecks the structure after severe weather.
Safety should never be sacrificed for speed.
FAQs: How to Install an Elevated Hunting Blind
How do you install an elevated hunting blind?
How high should an elevated hunting blind be?
Do elevated hunting blinds need to be anchored?
Can one person install an elevated deer blind?
What is the best stand for an elevated hunting blind?
Where should you install an elevated deer blind?
Should an elevated hunting blind be level?
How often should an elevated hunting blind be inspected?
Conclusion: Install Your Elevated Hunting Blind the Right Way
Learning how to install an elevated hunting blind is about much more than getting the blind off the ground. A successful installation starts with the right location and continues through stand selection, site preparation, leveling, anchoring, safe lifting, blind attachment, access installation, and final inspection.
Before using your elevated blind, make sure the entire system is stable, properly secured, compatible with the manufacturer’s requirements, and safe to access.
The most important principles are simple:
- Choose the right location.
- Use a compatible elevated stand.
- Evaluate ground conditions.
- Follow manufacturer instructions.
- Never improvise structural connections.
- Use an appropriate method to lift heavy blinds.
- Properly secure and anchor the structure.
- Install safe access.
- Check doors and windows.
- Inspect the entire setup before hunting.
- Reinspect after severe weather.
- Maintain the blind and stand throughout the year.
Whether you are setting up a blind for bowhunting, gun hunting, a food plot, agricultural field, or wooded property, a properly planned elevated system can provide a comfortable and effective hunting environment.
When you’re ready to build your setup, explore Hunting Blind Supply’s deer hunting blinds, elevated wood stands, elevated steel stands, and hunting blind accessories to find equipment suited to your hunting property.
Shop Hunting Blind Supply and build your elevated hunting blind setup with confidence.


One thought on “How to Install an Elevated Hunting Blind | Complete Step-by-Step Guide”