Blog
How to Shoot a Bow From a Hunting Blind | Complete Guide

How to Shoot a Bow From a Hunting Blind | Complete Guide
Introduction
Shooting a bow from a hunting blind is different from shooting in an open field or at an outdoor range. The blind’s walls, windows, roof, seat, shooting ports, and surrounding vegetation can all affect your stance, draw cycle, visibility, and shooting angle.
For a successful bowhunting setup, simply being able to see a deer through a window isn’t enough. You need enough room to draw your bow quietly, establish a consistent anchor point, maintain a safe shooting position, and execute a controlled shot without the blind interfering with your equipment or movement.
This guide explains how to shoot a bow from a hunting blind, from choosing the right blind and preparing the interior to practicing from realistic shooting positions. You’ll also learn how to handle shooting angles, window placement, blind height, concealment, noise, equipment clearance, and common mistakes.
Whether you’re a beginner preparing for your first bowhunting blind or an experienced hunter optimizing an existing setup, these principles can help you build a more practical and comfortable shooting environment. Explore complete in depth guide on bow hunting blinds for more insights and information on bow hunting.
What Makes Shooting a Bow From a Blind Different?
A hunting blind creates an enclosed shooting environment.
That can be an advantage because the structure can conceal movement. However, it also introduces obstacles that aren’t present when you’re shooting outdoors.
Inside a blind, you may have to account for:
- Window frames
- Walls
- Roof height
- Seats
- Shooting rests
- Doorways
- Other hunters
- Backpacks and equipment
- Bow limbs
- Bowstring
- Broadheads and arrows
- Nearby vegetation
Your normal shooting form should remain consistent, but your environment changes.
That’s why practicing only at a conventional archery range isn’t enough.
You should practice from the same type of position, window and blind configuration you’ll use while hunting.
Why Blind Design Matters for Bowhunting
Not every hunting blind is equally suited to shooting a bow.
A blind designed around firearm hunting may have window positions and interior dimensions that aren’t ideal for archery.
When selecting a bow hunting blind, pay attention to:
Interior dimensions
You need sufficient room to rotate your body and draw your bow without contacting the blind.
Window placement
The window should allow you to see your shooting area while providing enough clearance for your bow.
Window operation
A loud or difficult-to-operate window can create problems when a deer is nearby.
Roof height
You need enough vertical clearance to draw and shoot comfortably.
Shooting angles
Multiple windows or appropriately positioned openings can give you more opportunities without requiring excessive body movement.
Concealment
The blind should help conceal your movements, particularly during the draw cycle.
Choose the Right Hunting Blind for Bowhunting
Bowhunters commonly use several types of blinds.
Ground Blinds
Ground blinds can be useful where you want flexible placement and relatively simple access.
They are particularly practical in:
- Wooded areas
- Field edges
- Food plots
- Small properties
- Areas where elevation isn’t necessary
Your main concern is making sure there is enough room inside to draw and maneuver your bow.
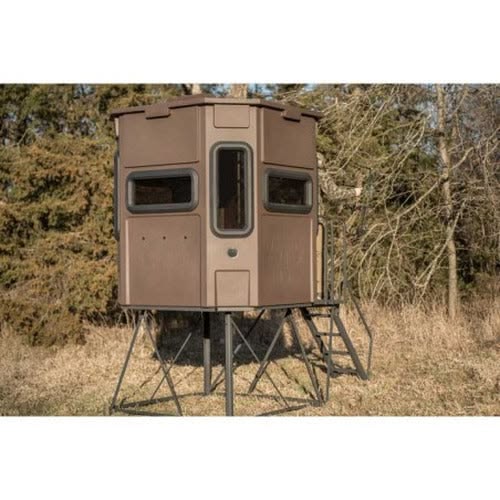
Elevated Bow Hunting Blinds
Elevated blinds provide a higher shooting position.
Potential advantages include:
- Improved visibility
- Better observation of surrounding terrain
- Additional concealment
- More comfortable long-duration hunting
- Better visibility over vegetation
However, elevated setups introduce additional considerations such as access, stability, height, shooting angle and safety.
Enclosed Box Blinds
Enclosed blinds can provide substantial protection from weather and a controlled shooting environment.
They can be particularly useful for long sits, but interior space and window placement become especially important for bowhunters.
Check Your Interior Shooting Space
Before hunting from a blind, physically test the space.
Take your bow inside and check:
- Standing position
- Sitting position
- Left-side shots
- Right-side shots
- Forward shots
- Rearward angles where applicable
- Draw cycle
- Anchor position
- Follow-through
Don’t just stand in the center and draw once.
Move into the actual shooting positions you expect to use.
A simple clearance test
Stand or sit in your intended shooting position.
Then:
- Place your feet where they will normally be.
- Position your bow.
- Draw normally.
- Reach your normal anchor point.
- Check the limbs and string.
- Slowly rotate toward the window.
- Check for contact with the frame or wall.
- Repeat from other shooting positions.
If something interferes with your movement, solve the problem before hunting.
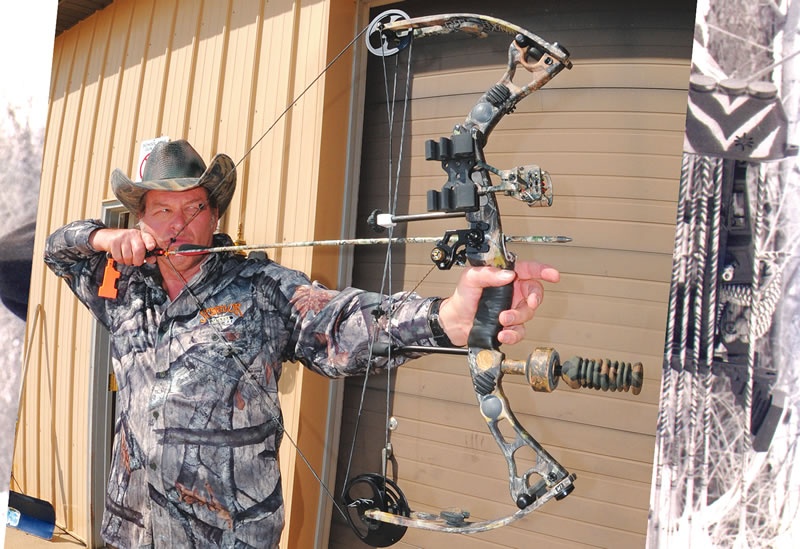
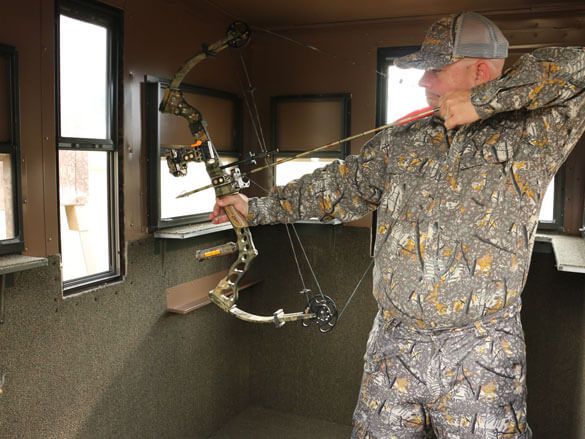
Understand Bow Clearance
Bow clearance is one of the most overlooked considerations when shooting from a blind.
Your bow doesn’t stop at your hands.
Depending on your equipment, you also have to account for:
- Upper and lower limbs
- Cam system
- String
- Cable system
- Sight
- Stabilizer
- Quiver
- Arrow
- Broadhead
A blind that feels spacious when you’re sitting still can become surprisingly restrictive once you draw.
Check clearance at full draw
Don’t only check clearance while holding the bow at rest.
The important test occurs when you’re at full draw and moving toward your shooting position.
If the bow contacts the blind, you may create:
- Noise
- Vibration
- Inconsistent shooting form
- Equipment damage
- An unsafe shooting position
Choose the Right Shooting Position
Your shooting position should allow you to remain comfortable while maintaining consistent form.
Sitting Position
Sitting can be useful when hunting from a blind for long periods.
Make sure:
- Your seat doesn’t restrict movement.
- Your knees aren’t blocking your bow.
- You can stand quietly if needed.
- You have sufficient headroom.
- You can rotate toward the shooting window.
Standing Position
Standing can provide additional flexibility for certain shots.
However, standing also creates more visible movement.
Practice standing slowly and quietly before hunting.
How to Draw Your Bow Inside a Blind
The draw cycle should be controlled and deliberate.
The exact technique depends on your equipment and established shooting form, but the goal is to preserve the same fundamentals you use during normal practice.
Focus on:
- Stable footing
- Controlled movement
- Consistent anchor point
- Proper posture
- Minimal unnecessary motion
- Clear bow path
- Clear window opening
Draw before the deer reaches your shooting window when practical
If you can anticipate a deer approaching and safely prepare without exposing yourself, having your bow positioned and being ready can reduce the amount of movement required when the deer is close.
Don’t rush your draw.
A sudden movement can be more noticeable than a slow, controlled movement.
Position Your Bow Before the Deer Arrives
Organization matters.
Your bow should be positioned where you can reach it quietly without knocking into other equipment.
Keep unnecessary items away from:
- Your feet
- Your bow
- Your shooting window
- Your seat
- Your turning area
A cluttered blind can make an otherwise simple shot unnecessarily difficult.
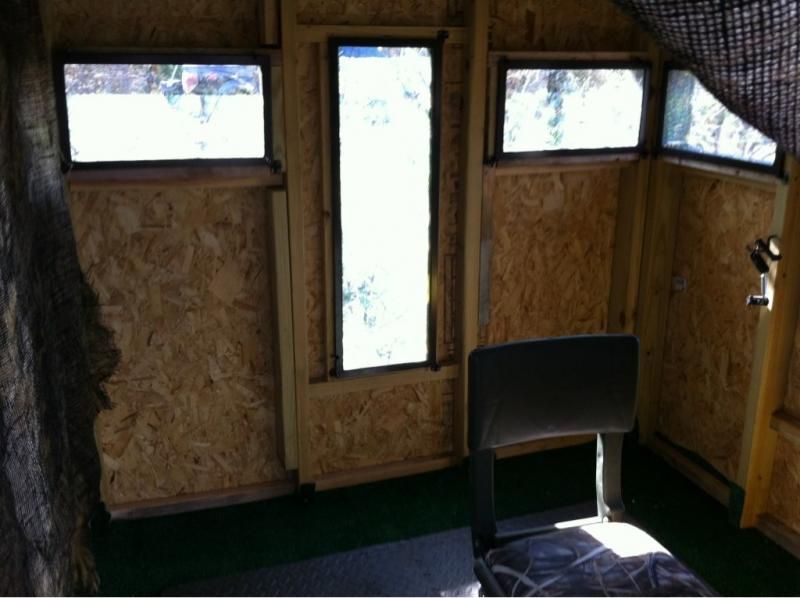
Shooting Through Blind Windows
Your window is effectively your shooting portal.
Its size and position can influence:
- Visibility
- Shooting angle
- Bow clearance
- Concealment
- Noise
- Movement
Before hunting, test every window you may use.
Check these five things
1. Can you see the intended shooting zone?
2. Can you draw without contacting the window?
3. Can you reach full draw comfortably?
4. Can you maintain your normal anchor point?
5. Can you execute the shot without interference?
If any answer is no, adjust your position or blind setup.
How to Choose the Right Window Height
Window height matters because deer aren’t always standing at the same elevation relative to your blind.
A ground-level blind and an elevated blind may require different shooting positions.
Your window should allow you to:
- Maintain natural posture
- See the target area
- Draw comfortably
- Aim without excessive bending
- Avoid contact with the window frame
The best setup is the one that allows you to use your normal shooting mechanics rather than forcing an awkward position.
Shooting Angles From a Hunting Blind
A deer may not always present a perfect broadside opportunity.
You should understand how your blind interacts with different approach directions.
Potential shooting directions include:
- Straight ahead
- Left side
- Right side
- Slightly behind
- Diagonal angles
The blind should be positioned so that your most likely shooting opportunities are accessible without excessive movement.
Avoid extreme movement
If a deer is already close, turning your entire body toward a new window can create unnecessary movement.
Planning your windows and seating position beforehand can reduce this problem.
Shooting From an Elevated Blind
Shooting from an elevated blind introduces an important variable: downward shot angle.
Your sight picture and arrow trajectory can differ from what you experience shooting from level ground.
Practice from the approximate height of your hunting blind.
Consider:
- Blind height
- Distance to the target
- Downward angle
- Deer position
- Window height
- Shooting clearance
Most importantly, follow your equipment manufacturer’s instructions and your established archery practice standards.
Shooting From a Ground Blind
Ground blinds generally produce a more level shooting angle.
However, they still require careful attention to:
- Window height
- Vegetation
- Shooting lanes
- Interior clearance
- Concealment
- Deer distance
Because the blind is close to ground level, nearby vegetation can quickly interfere with an arrow path.
Clear only the vegetation necessary to establish safe, practical shooting lanes.
How to Practice Shooting From a Blind
This is arguably one of the most valuable steps in the entire setup.
Don’t wait until opening day.
Practice the entire sequence.
Practice drill
Start seated with your bow positioned naturally.
Then:
- Identify a target.
- Slowly reach for your bow.
- Establish your shooting position.
- Draw your bow.
- Move toward the window.
- Establish your anchor.
- Aim.
- Hold steady.
- Execute your normal shot.
- Repeat from another window.
Practice without rushing.
Practice at realistic distances
If your intended hunting setup provides shooting opportunities at several distances, practice those distances.
For example:
- Close-range target
- Medium-range target
- Different angles
- Elevated position
- Sitting and standing
The goal isn’t simply accuracy.
You’re also practicing movement, clearance and consistency inside the blind.
Rangefinding and Judging Distance
Accurate distance estimation is important for bowhunting.
A rangefinder can help you understand the distance to known landmarks before a deer arrives.
Consider ranging:
- Food plot edges
- Deer trails
- Trees
- Shooting lanes
- Rocks
- Fence lines
- Other fixed landmarks
This allows you to become familiar with the shooting area.
If you use a rangefinder during hunting, make sure its use doesn’t require unnecessary movement at a critical moment.
Broadside, Quartering and Other Angles
Deer may approach from different directions.
Before hunting, think about how your blind handles each likely angle.
Broadside
A broadside position can provide a clear view of the animal’s body and may be easier to evaluate than a heavily obstructed angle.
Quartering
Quartering positions require additional judgment.
Don’t force a shot simply because the deer is within your normal practice range.
Facing or walking-away deer
These situations may not provide the appropriate shot opportunity.
The key principle is to wait for a suitable, ethical shot rather than trying to make every deer encounter into a shot opportunity.
Deer Movement and Shot Preparation
A blind can help conceal movement, but concealment isn’t permission to move excessively.
Pay attention to:
- Deer direction
- Deer speed
- Deer behavior
- Other nearby deer
- Wind
- Vegetation
- Your shooting position
If a deer is approaching from a predictable direction, prepare before it reaches your immediate shooting area when conditions allow.
Reducing Noise and Unnecessary Movement
Noise can come from more than your bow.
Potential sources include:
- Windows
- Doors
- Seats
- Equipment
- Clothing
- Zippers
- Bow contact with walls
- Arrow contact with equipment
- Foot movement
Before hunting, operate the blind’s windows and doors.
Listen for:
- Squeaking
- Clicking
- Rattling
- Metal contact
- Loose components
Fix obvious sources of unnecessary noise before your hunt.
Concealment While Drawing Your Bow
One advantage of a properly designed blind is that the structure can help conceal movement.
Use that advantage intelligently.
When possible:
- Stay inside the darker interior
- Avoid standing unnecessarily
- Keep movement controlled
- Use the blind’s structure to break up your outline
- Avoid silhouetting yourself in the window
Don’t make exaggerated movements simply because you believe the blind will hide them.
Managing Gear Inside the Blind
A bowhunting blind should be organized before you sit down.
A practical arrangement might look like:
Bow → shooting side
Arrows → safely accessible
Rangefinder → reachable
Pack → out of the main movement area
Water → accessible without knocking equipment
Other gear → stored away from shooting positions
Keep your shooting area clear.
A clean interior gives you more freedom to move when a deer appears.
Shooting Through Different Window Designs
Different window systems can affect the shooting experience.
Sliding Windows
These can provide adjustable openings while allowing hunters to control the size of the shooting area.
Hinged Windows
Hinged or flip-down windows can create broad openings, but hunters should test how the open window interacts with their bow.
Vertical Windows
Vertical configurations can provide different visibility and shooting options depending on the blind design.
360-Degree Window Systems
Octagonal or 360-degree blinds can provide multiple shooting directions.
The advantage is broader visibility, but hunters should still plan their primary shooting positions instead of trying to cover every direction equally.
Bow Hunting Blind Setup for Multiple Hunters
Sharing a blind with another hunter requires additional planning.
Before hunting together, decide:
- Which windows each person will use
- Where each bow will be positioned
- How hunters will move
- Where equipment will be stored
- Which shooting directions belong to each hunter
- How you will communicate quietly
Never assume that another hunter can move safely out of your shooting area.
Establish clear shooting responsibilities before the hunt begins. Read more on how to set up a bow hunting blind for deers.
Common Mistakes When Shooting From a Blind
Mistake 1: Never Practicing From the Blind
Range practice doesn’t fully replicate blind shooting.
Solution: Practice from the actual hunting position.
Mistake 2: Choosing a Blind That Is Too Small
Limited space can interfere with your draw cycle.
Solution: Verify interior clearance before buying or installing the blind.
Mistake 3: Ignoring Window Frames
A window can look large enough until you reach full draw.
Solution: Test clearance at full draw.
Mistake 4: Sitting Too Close to the Window
This can restrict your movement and change your shooting form.
Solution: Experiment with your seating position before hunting.
Mistake 5: Allowing Equipment to Block Movement
A backpack or chair can interfere when you need to rotate.
Solution: Organize equipment before the hunt.
Mistake 6: Making Sudden Movements
Even inside a blind, unnecessary movement can create problems.
Solution: Practice slow, controlled movements.
Mistake 7: Ignoring Elevated Shooting Angles
Shooting downward can feel different from level-ground practice.
Solution: Practice from the approximate elevation of your blind.
Mistake 8: Creating Poor Shooting Lanes
A deer can appear in the perfect location but be blocked by branches.
Solution: Establish practical shooting lanes before hunting.
Mistake 9: Relying Entirely on the Blind for Concealment
A blind helps, but poor positioning can still expose movement.
Solution: Combine blind concealment with thoughtful placement and controlled movement.
Mistake 10: Taking a Shot You Aren’t Prepared For
Not every deer encounter provides an appropriate opportunity.
Solution: Know your equipment, practice range and personal limitations, and wait for a suitable shot.
Bow Hunting Blind Shooting Checklist
Before hunting, run through this checklist.
Blind
- Blind is stable and secure
- Windows operate quietly
- Door operates properly
- Interior provides adequate space
- Roof provides sufficient clearance
- Seat doesn’t restrict movement
Bow
- Bow fits comfortably inside the blind
- Limbs clear the walls
- String and cables clear obstacles
- Sight has adequate clearance
- Stabilizer doesn’t contact the blind
- Quiver doesn’t interfere with movement
Shooting
- Primary shooting lanes are clear
- Shooting distance has been evaluated
- Window height is appropriate
- Shooting angles have been tested
- Bow can be drawn quietly
- Normal anchor point can be maintained
- Shot execution can occur without blind interference
Safety
- Shooting lanes are identified
- Target and surroundings can be positively identified
- Other hunters understand shooting directions
- Elevated access has been inspected
- Equipment is safely organized
- Local hunting regulations are understood and followed
Practical Bow Hunting Blind Setup Examples
Example 1: Ground Blind on a Food Plot
Imagine a ground blind positioned along the edge of a food plot.
Deer frequently enter from the timber and move toward the plot.
A practical approach is to:
- Identify the most common approach route.
- Position the blind where shooting distances are realistic.
- Check prevailing wind.
- Create limited shooting lanes.
- Position the seat so the primary shooting window is easy to reach.
- Place your bow where it can be accessed quietly.
- Range fixed landmarks.
- Practice shooting from the actual window.
The goal is to make the blind feel like a familiar shooting environment before hunting season.
Example 2: Elevated Blind Overlooking a Field
An elevated blind overlooking an agricultural field may provide greater visibility.
Before hunting:
- Identify common deer entry points.
- Determine the primary shooting directions.
- Check the blind’s height and access.
- Test shooting angles from the elevated position.
- Range several landmarks.
- Check bow clearance through each window.
- Practice both seated and standing positions.
- Confirm that the structure and access system are secure.
Example 3: Two Hunters in One Blind
For two bowhunters sharing an enclosed blind, assign shooting directions before the hunt.
One hunter might primarily use the left-side windows while the other uses the right-side windows.
Both hunters should know:
- Where the other person’s bow is located
- Which directions are safe
- When movement is necessary
- How they will communicate
- Which areas are off-limits for shooting
Good communication can prevent confusion when a deer suddenly appears.
How to Improve Your Bow Hunting Blind Shooting Setup
Once you’ve hunted from your blind a few times, evaluate what actually worked.
Ask yourself:
- Was the window in the right position?
- Did I have enough room to draw?
- Was my seat comfortable?
- Could I see the approach routes?
- Were my shooting lanes sufficient?
- Did the blind create unnecessary noise?
- Did my equipment get in the way?
- Was my entry route practical?
- Did the blind height work for the terrain?
- Did I have enough visibility?
Small improvements can make the setup much more practical.
When Should You Practice Shooting From a Blind?
Ideally, practice before the hunting season begins.
Don’t wait until a deer is standing outside the window.
Practice:
- During daylight
- From your actual seat
- Through your actual windows
- At realistic distances
- At your intended blind height
- From multiple shooting positions
The more familiar the environment becomes, the less you’ll have to think about the physical mechanics of operating inside the blind.
FAQs: How to Shoot a Bow From a Hunting Blind
Can you shoot a bow from a hunting blind?
How much room do you need to shoot a bow in a blind?
How do you draw a bow without spooking deer from a blind?
Can you shoot a bow from an elevated hunting blind?
Are ground blinds good for bowhunting?
What is the best window for shooting a bow from a blind?
Should you practice shooting from your hunting blind?
How do you avoid making noise while shooting a bow from a blind?
Conclusion On How to Shoot a Bow From a Hunting Blind
Knowing how to shoot a bow from a hunting blind isn’t simply about putting your bow through a window and taking a shot. The entire environment needs to support your shooting process.
Start with the right blind and make sure it provides adequate interior space. Then evaluate window placement, bow clearance, shooting angles, blind height, shooting lanes, concealment and equipment organization.
Most importantly, practice from the actual blind before hunting. Draw your bow from the position you’ll use, test every relevant window, check your equipment clearance and practice at realistic distances.
A well-planned blind should allow you to remain comfortable, make controlled movements and maintain your normal shooting mechanics without unnecessary interference.
For hunters looking for purpose-built options, Hunting Blind Supply is presented by the business as the #1 trusted seller for deer hunting blinds, with options designed for different hunting methods, property layouts and blind configurations.
When you’re ready to build or upgrade your setup, explore Hunting Blind Supply’s bow hunting blinds and related elevated hunting blind systems to find an option that fits your hunting property and shooting requirements.





4 thoughts on “How to Shoot a Bow From a Hunting Blind | Complete Guide”